Getting started with Ledger
Ledger is a personal money tracker. Use it to record income and expenses, set monthly budgets, keep track of recurring bills, save toward goals, and see where your money goes. Everything is stored on your phone — Ledger doesn’t need an account or an internet connection.
Getting around
The first time you open Ledger, it asks for permission to send notifications. Tap Allow if you want bill reminders and budget alerts. You can change this later in Settings.
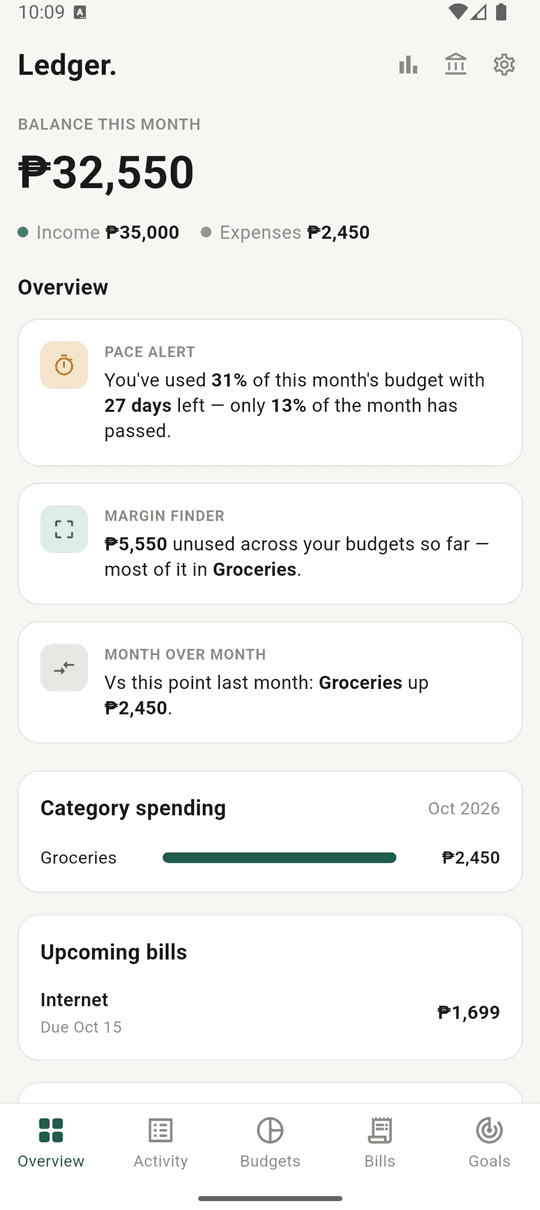
The top of every main screen shows your Balance this month, which is your income minus your expenses for the month, along with the two totals.
Use the five tabs at the bottom of the screen to move between sections:
| Tab | What it’s for |
|---|---|
| Overview | Insights and a summary of your month |
| Activity | Adding and viewing transactions |
| Budgets | Monthly spending limits per category |
| Bills | Recurring bills and their due dates |
| Goals | Savings goals |
On the Overview tab, three icons in the top-right corner open Reports (bar chart), Loans (bank), and Settings (gear).
Record a transaction
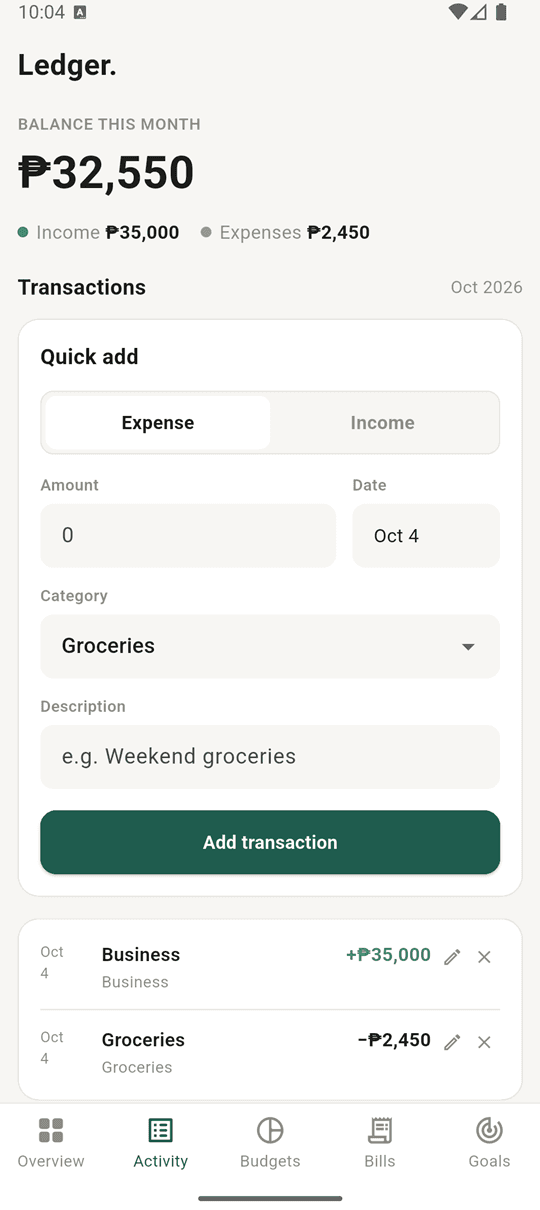
- Tap the Activity tab.
- In the Quick add card, choose Expense or Income.
- Enter the Amount.
- Leave the Date as today, or tap it to pick another day.
- Choose a Category, for example Groceries or Utilities.
- Optionally, add a Description, such as “Weekend groceries”.
- Tap Add transaction.
The transaction appears in the list below the form, and your balance updates immediately. Income is shown in green with a + sign.
- To edit a transaction, tap the pencil icon next to it, change the details, and save.
- To delete a transaction, tap the ✕ next to it.
Transactions created by logging a bill payment are marked with a small Bill tag.
Set a budget
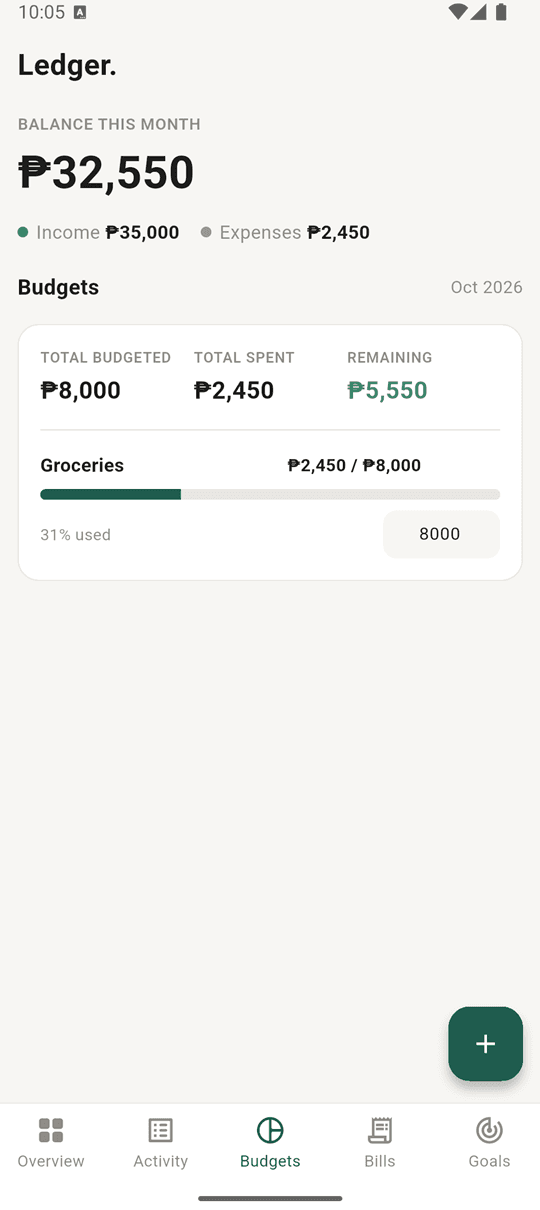
- Tap the Budgets tab.
- Tap the + button in the bottom-right corner.
- Pick an expense Category.
- Enter a Monthly limit.
- Tap Add budget.
Each budget shows a progress bar with how much you’ve spent against the limit, and the percentage used. A budget you’ve gone past is marked Over. The card at the top adds up Total budgeted, Total spent, and Remaining across all your budgets.
To change a limit, tap the amount box on the right of a budget, type the new number, and press Done on the keyboard.
Each category can have one budget. Once every expense category has a budget, the + button tells you so.
Add a recurring bill
Add bills that repeat every month, like rent, internet, or subscriptions, so you don’t forget them.
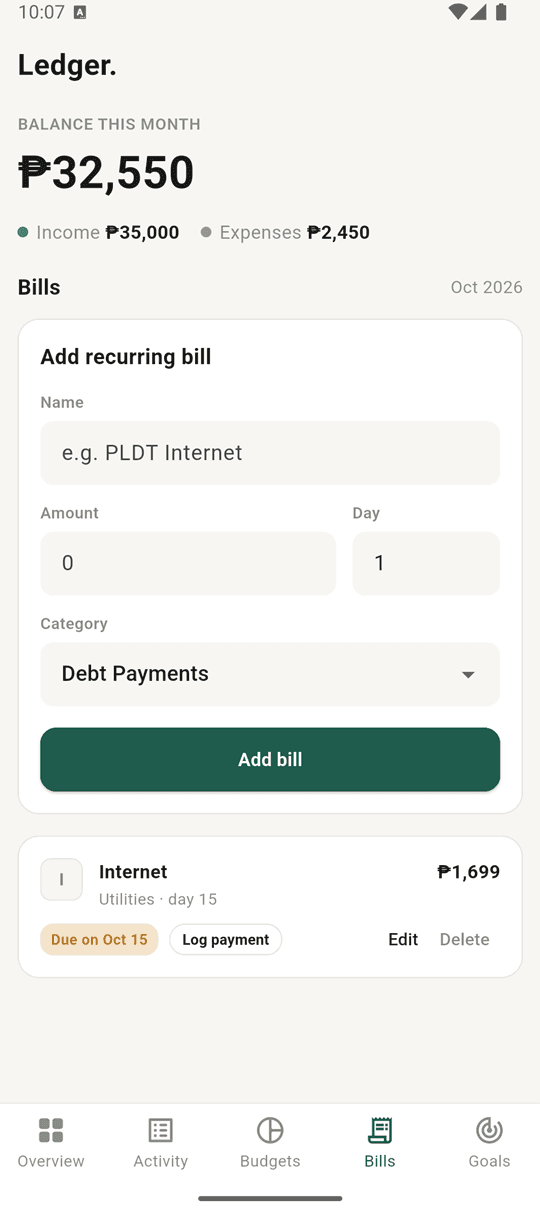
- Tap the Bills tab.
- In Add recurring bill, enter a Name, for example “PLDT Internet”.
- Enter the Amount.
- Enter the Day of the month the bill is due (1–31).
- Choose a Category.
- Tap Add bill.
Each bill shows its status for the current month:
- Due on [date]: not paid yet.
- Overdue since [date]: the due date has passed and the bill hasn’t been paid.
- Paid [date]: you’ve logged a payment this month.
When you pay a bill, tap Log payment. Ledger records the payment as a transaction for you and marks the bill as paid. Use Edit to change a bill’s details, or Delete to remove it.
Save toward a goal
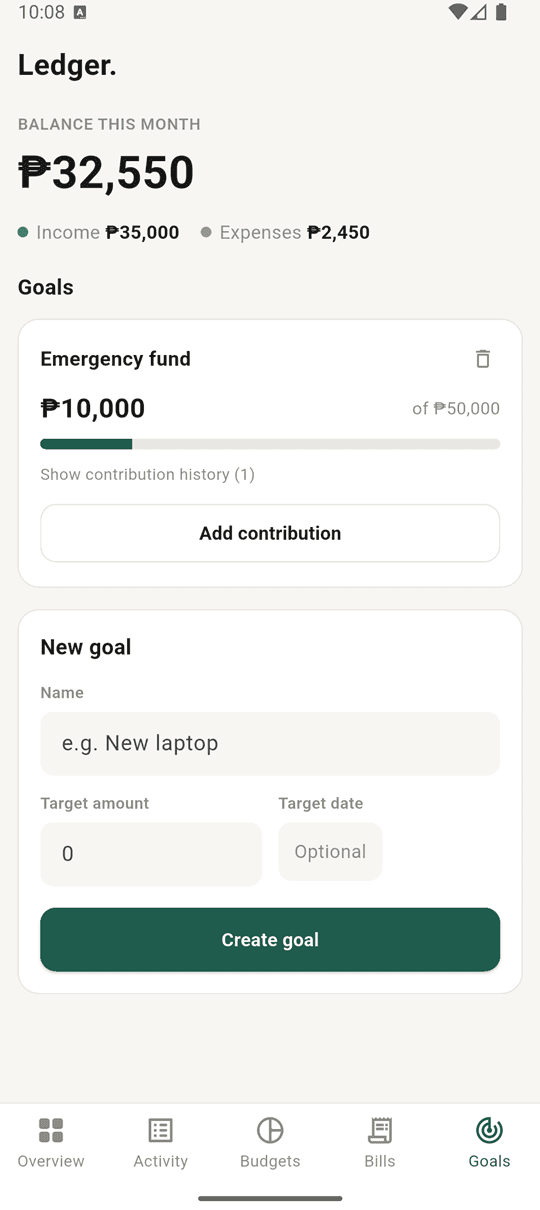
- Tap the Goals tab.
- In the New goal card, enter a Name, for example “New laptop”.
- Enter a Target amount.
- Optionally, set a Target date.
- Tap Create goal.
To add money to a goal, tap Add contribution on the goal card, enter the amount, and tap Add. The progress bar fills as you save, and the goal shows Funded once you reach the target.
Tap Show contribution history to see every contribution you’ve made. To delete a goal and its history, tap the trash icon on the goal card.
Read your Overview
The Overview tab turns your data into quick insights:
- Pace alert: whether your spending is ahead of or behind schedule, comparing how much of your budget you’ve used with how much of the month has passed.
- Margin finder: how much unspent budget you have left, and in which category.
- Month over month: your biggest change in spending compared with the same point last month.
- Category spending: where your money went this month, by category.
- Upcoming bills: bills that are due soon.
- Goals: progress on your savings goals.
These cards appear once you’ve added some transactions, budgets, bills, or goals.
View reports
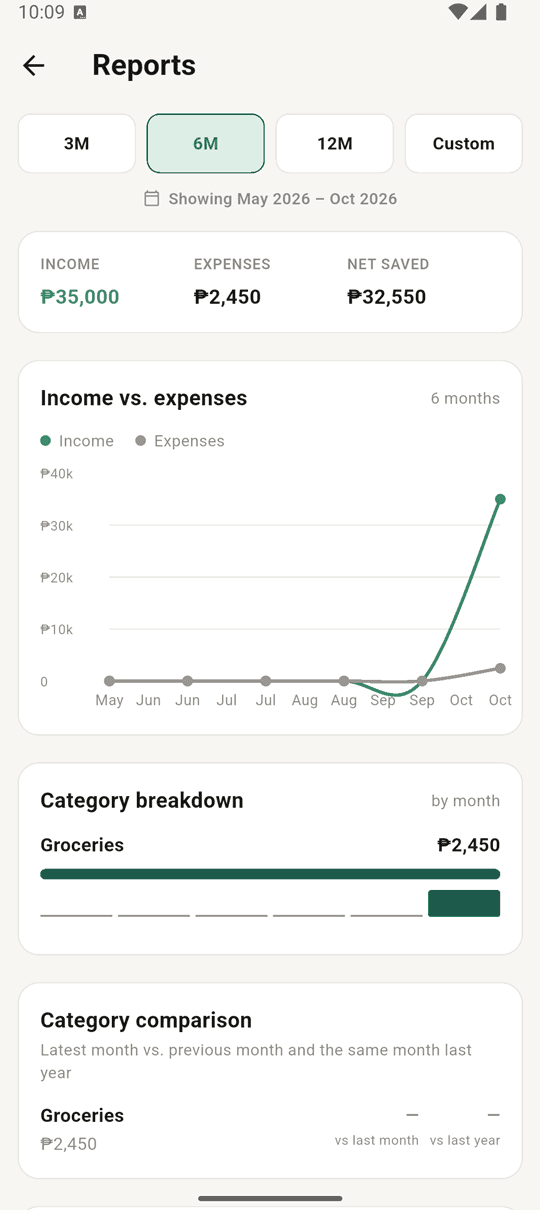
Tap the bar chart icon at the top of the Overview tab to open Reports.
- Choose a time period: 3M, 6M, 12M, or Custom to pick your own date range.
- Scroll to see:
- Income, Expenses, and Net saved for the period
- An Income vs. expenses chart over time
- A Category breakdown, month by month
- A Category comparison with last month and the same month last year
- Budget vs. actual, recurring vs. one-off spending, and unusually large transactions
- To save the report as a spreadsheet, use Export report (CSV).
Track a loan
Use loans for fixed-term debt, like a car loan or personal loan. Loans are tracked separately from bills.
- On the Overview tab, tap the bank icon at the top. You can also go to Settings → Loans.
- Tap the + button.
- Fill in the Name, Lender (optional), Principal amount, Interest rate %, Term (months), Monthly payment, Payment day, Start date, and Category.
- Tap Add loan.
Each loan card shows the remaining balance and how much of the loan you’ve paid off. Tap Log payment each time you make a payment. To see past payments, tap Show next to the payment history. If you stop paying a loan, you can use Mark as defaulted, and its history will still be available.
Settings
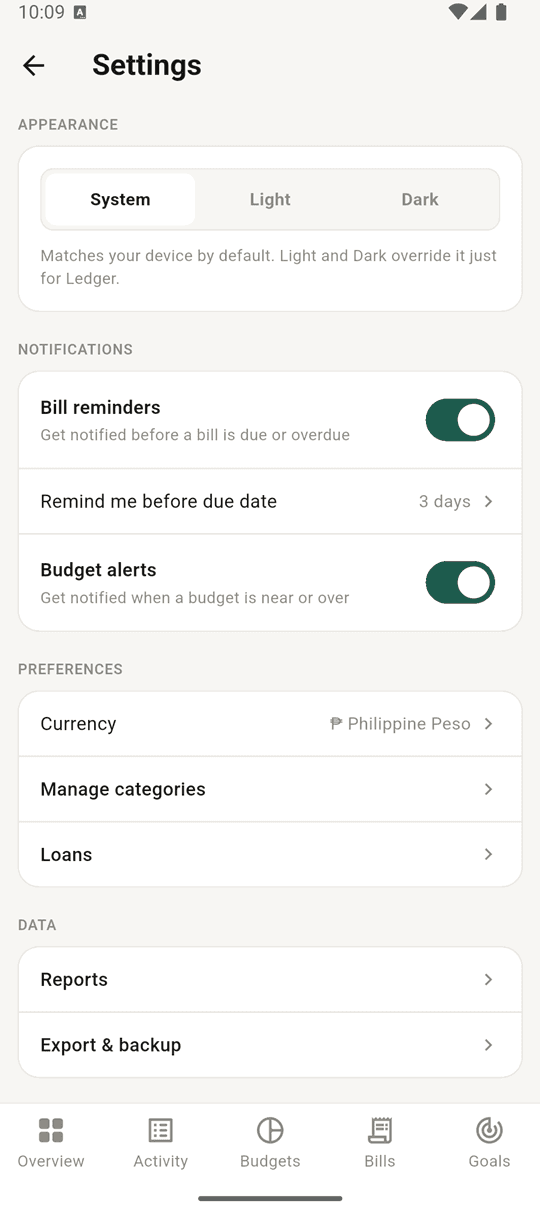
Tap the gear icon at the top of the Overview tab.
| Section | Option | What it does |
|---|---|---|
| Appearance | System / Light / Dark | Choose the app’s theme. System matches your phone’s setting. |
| Notifications | Bill reminders | Get notified before a bill is due, and when it’s overdue. |
| Remind me before due date | How many days ahead you’re reminded (0–30). | |
| Budget alerts | Get notified when a budget is close to or over its limit. | |
| Preferences | Currency | The currency used for every amount in the app. Search to find yours. |
| Manage categories | Add, rename, or delete income and expense categories. | |
| Loans | Opens the Loans screen. | |
| Data | Reports | Opens the Reports screen. |
| Export & backup | Back up or restore your data (see Back up and restore your data). | |
| About | Privacy policy, Terms of service, App version | Legal documents and the app version. |
Back up and restore your data
Your data lives only on your phone, so make a backup regularly, especially before switching phones.
To make a backup:
- Go to Settings → Export & backup.
- Tap Backup passphrase and set a passphrase of at least 8 characters. Write it down somewhere safe. You’ll need it to restore the backup.
- Tap Back up now.
- In the share menu that opens, choose where to save the backup file, such as Google Drive, email, or your Files app.
To restore a backup:
- Go to Settings → Export & backup → Restore from backup.
- Tap Restore to confirm.
- Choose your Ledger backup file.
- Enter the passphrase for that backup.
- When you see Restore complete, close and reopen Ledger so the restored data appears everywhere.
⚠️ Restoring replaces the data currently on your phone with the data from the backup file.
Quick tips
- Add a few budgets first. The pace alert and margin finder only work once you have budgets.
- Log bill payments with Log payment instead of adding them by hand. That way the bill is marked as paid and you won’t record it twice.
- Make your own categories in Settings → Manage categories if the built-in ones don’t fit.
Read the full Ledger Privacy Policy.